Refer to the linked articles below for how to retrieve logs on the particular software you are using, or if LDARtools Support has requested logs and you need to attach logs to the reported issue.
New Reported Issue
The following procedure assumes the user has logged in to the LDARtools Customer Portal, selected New Issue, and completed the entries to report either a hardware or software issue. If you are not sure how to report a new issue, please see Reporting a New Issue.
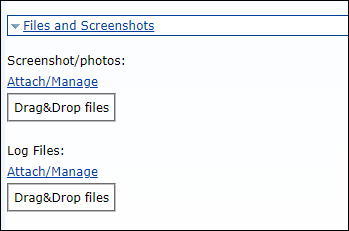
The file may be “dragged & dropped” directly into the Drag&Drop box, or by using the Attach/Manage methods.
-
“Drag&Drop” Method
-
Locate the file that needs to be attached to the issue.
-
Left-click and hold the file.
-
Move the log or file from the current location to the Drag&Drop box on the issue. If done properly, the border around the Drag&Drop box will turn red, indicating the log or file is accepted.

-
Release the left-click to ‘drop’ (attach) the log or file into the box.
-
Press Finish when done attaching all files.
-
-
Attach/Manage Method
-
Click the Attach/Manage line to activate the Attachments window.
-
Locate and click the Attach File(s) button to open the File Explorer window.
-
Navigate to the location of the log or file in the left-hand column.
-
Select the log or file in the right-hand column and click Open. The log or file will be imported to the Attachments window, after which, press Finish to complete the procedure.
-
Open Issue (Previously Reported)
The following procedure concerns attaching logs or files to an open issue (previously reported) where Support has requested additional logs or files.
-
Log in to the Customer Portal.
-
Select the appropriate classification: Hardware Issues, or Software Issues.
-
Locate the reported issue by serial number.
-
Press the Edit icon to open the Issue Record.
-
Type in the Additional Notes field: “Requested log or file Attached.”
-
“Drag&Drop” Method:
-
Locate the file that needs to be attached to the issue.
-
Left-click and hold the file.
-
Move the log or file from the current location to the Drag&Drop box on the issue. If done properly, the border around the Drag&Drop box will turn red, indicating the log or file is accepted.

-
Release the left-click to ‘drop’ (attach) the log or file into the box.
-
-
Attach/Manage Method:
-
Click the Attach/Manage line to activate the Attachments window.
-
Locate and click the Attach File(s) button to open the File Explorer window.
-
Navigate to the location of the log or file in the left-hand column.
-
Select the log or file in the right-hand column and click Open. The log or file will be imported to the Attachments window, after which, press Finish to complete the procedure.
-
-
Once all additional logs and files are attached, press Save. The open issue will update and alert Support to the new attachment(s).
