Click here for a printable version of this procedure.
Items Needed
Probe Repair Tool Kit (LDAR# 4040)
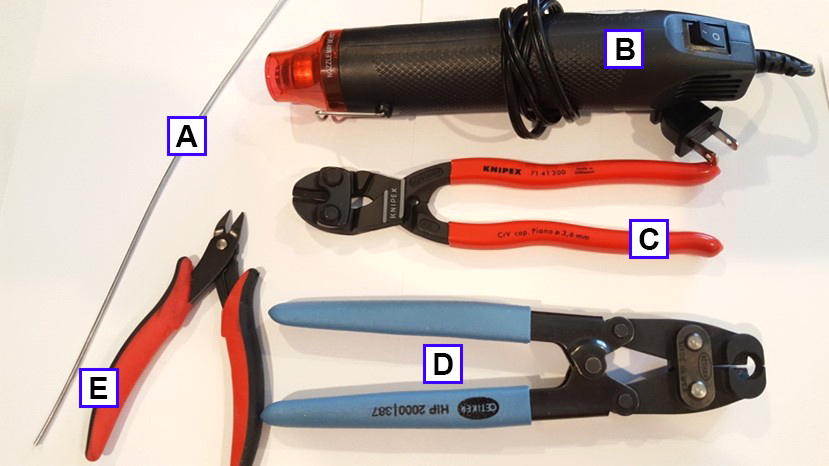
| Picture ID | Part Name | LDAR Part # |
|---|---|---|
| A | Rod for threading tubing through sheath | 42099 |
| B | Heat Gun | 4231 |
| C | Angled High Leverage Cutters | 4234 |
| D | Pinch Clamp Pliers | 4201 |
| E | Angled Wire Cutters* | 1741 |
*Included in phx42 Level 1 Tool Kit (LDAR# 4203)
| Additional Recommended Supplies |
|---|
| Snoop Liquid Leak Detector, or other Non-VOC material for lubrication of tubing |
Probe Repair Kit (LDAR# 4020)
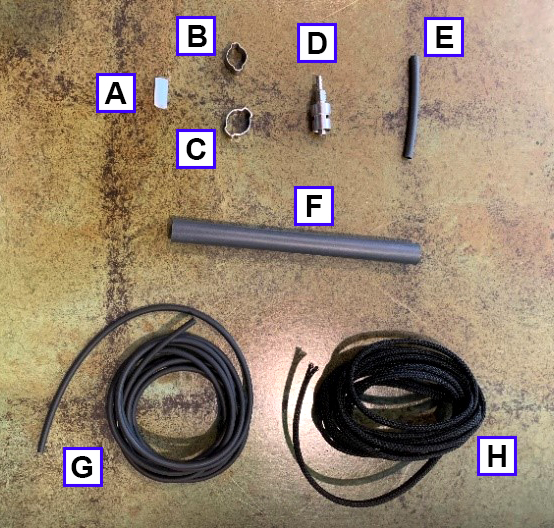
| Picture ID | Part Name | LDAR Part # |
|---|---|---|
| A | White Teflon Collar | 42420 |
| B | Small Pinch Clamp | 42091 |
| C | Large Pinch Clamp | 42093 |
| D | Male Luer Lock | 42084 |
| E | Small Heat Shrink | 42087 |
| F | Large Heat Shrink | 42094 |
| G | Viton Tubing | 42904 |
| H | Sheath | 42082 |
The pieces below should be left with the hardware making up the Probe Assembly:

| Picture ID | Part Name | LDAR Part # |
|---|---|---|
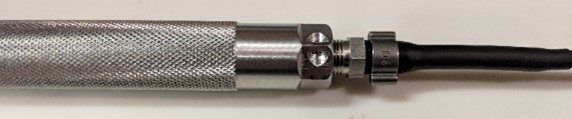
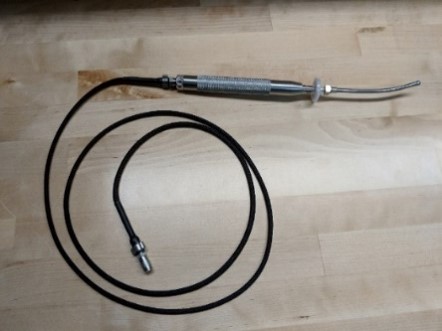
| A | Handle | 42081 |
| B | Quick Disconnect (with 1/16″ barb) | 4235 |
Probe Reassembly
-
Lubricate the new male luer lock with Snoop or equivalent. Do not use a lubricant with any VOC content. If you are not sure, test a sample of what you want to use with a phx42. That is what it is for!
-
Push Viton tubing onto the barb side of the male luer lock, stopping after the tubing has moved over the first ridge.
-
Feed the other end of the Viton tubing all the way through the center of the handle until you can thread the male luer lock into the handle.
-
Tighten the male luer lock into the handle first with your fingers, then give it a final gentle tightening with the pinch clamp pliers by gripping the fitting in the slot with the flats of the pliers. Do not overtighten, as doing so can mar or damage the fitting.

-
Slide 2 inches of the small heat shrink over the tubing until about 1 inch is inside the handle and about 1 inch is still visible.
-
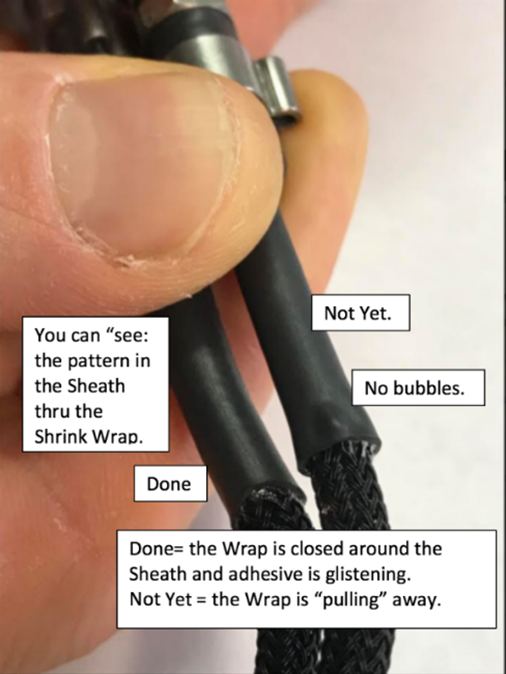
Use the heat gun to shrink the heat shrink to the tubing. This takes about 30-60 seconds.
| Heat Gun Tips |
|---|
| • Hold the heat gun about ½” from the surface of the heat shrink. • Start at the edge of the heat shrink on tubing side and work toward the applicable metal fitting, rotating the tubing so all sides are exposed to the heat gun. • You will be finished when the heat shrink has grown smaller, starts to shine, and you have a small excretion of adhesive at the tubing side that is glistening. |
-
Use the rod provided with the tool kit to feed the tubing through the sheath.

-
Slide the sheath over the barb at the base of the probe handle, far enough to cover the barb, but not so far that it has errant strands sticking out once the heat shrink is in place.
Tech Tip: You must have some fraying to allow the sheath to fit over the barb.
-
Insert 2.5 inches of the large heat shrink over the sheath-covered barb, then heat it with the heat gun following the “Heat Gun Tips” outlined below step 6.
Note: It is important to use the heat gun provided with the Probe Repair Tool Kit. Using a different tool may result in the melting of the sheath material.
-
Slide the small pinch clamp over the heat shrink then crimp in place using the pinch clamp pliers. Lightly crimp one side and then the other. Once they are lightly crimped, crimp each side tightly.
-
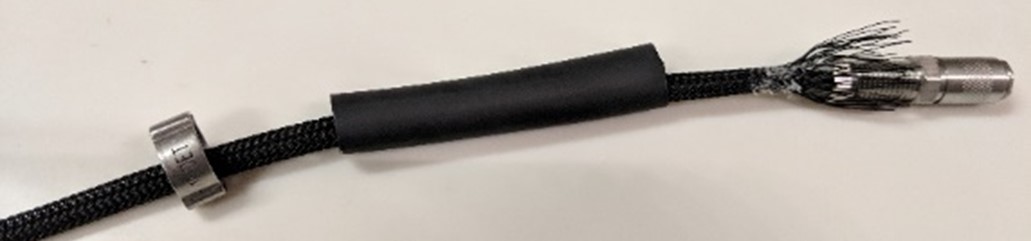
Starting at the handle, slowly work the sheath down toward the quick disconnect end of the probe to ensure there are no kinks/bunching.
Tech Tip: The sheath and tubing should come out, even with frayed ends protruding.
-
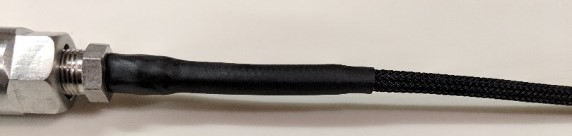
Slide the large pinch clamp over the sheathing.
-
Slide 2.5 inches of the large heat shrink over the sheathing, according to the photo.
-
Slide the white Teflon collar over the tubing and away from the edge.
-
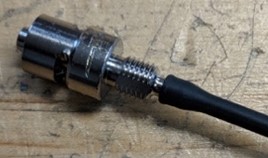
Slide the tubing onto the 1/16″ barb side of the quick disconnect. Slide the collar forward onto the barb until it and the tubing are flush with the base of the quick connect.
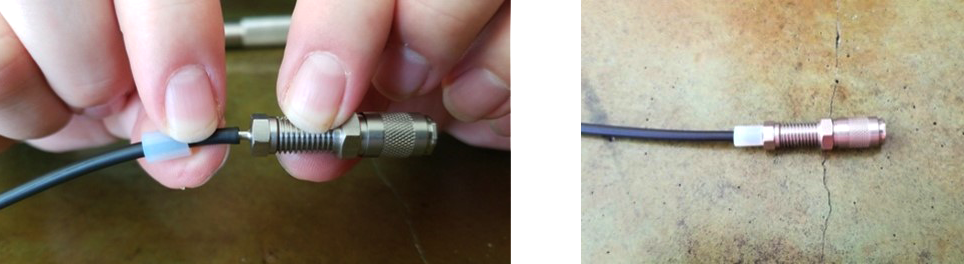
Tech Tip: Do not try to fully seat the tubing onto the barb. The collar will push the tubing the rest of the way onto the barb. If the tubing cannot move forward, you will create a bubble.
-
Slide the sheath over the threaded portion of the quick disconnect, again making sure it is on far enough that it will be covered by the heat shrink, but not so far that there are errant strands sticking out from under the heat shrink.
Tech Tip: You want strands extending all the way to the top of the threaded section. Trim off any extending past the threaded section.
-
Slide the heat shrink over the barb, then shrink it down over the sheath and the quick disconnect with the heat gun, follow the “Heat Gun Tips” below step 6 and work from the tubing side toward the quick disconnect.
-
Slide the large pinch clamp over the heat shrink-covered quick disconnect and tighten it the same way you tightened the small pinch clamp in step 10 above.
-
To ensure the probe repair is successful, follow the “Weekly Probe Integrity Inspection” procedure outlined in the phx42 manual.